I have become obsessed with the idea of having a wreath on my door for everything. So, I knew I needed to make a wreath for St. Patrick's Day. It isn't anything fancy, but I think people can tell what holiday it is for (and that's the point, right?), and it was very easy to make.
I started by carving a wreath-shape out of cardboard, like in this post. I just made a simple circle wreath. I then covered the wreath in cloth strips. I cut them about an inch and a half wide and wrapped them around the cardboard, overlapping as I went. (Note: They were different lengths because of some projects I had done with the fabric before.) I attached the fabric with hot glue as I went around the wreath.
I then used hot glue to glue on the three shamrocks at the bottom of the wreath. Then I wanted one to be hanging. I wrote "LUCK" on the hanging shamrock with glue and covered it with glitter. I hot glued ribbon to the back of it (long piece folded in half, the loose ends hanging off, not connected to the shamrock), then part of the way up the ribbon, I glued the ribbon to the wreath, leaving the excess hanging off at the top. I tied a bow at the very end of the ribbon and hung it from my wreath hanger.
I bought the shamrocks at Dollar Tree. The package came with 12 shamrocks (6 dark glittery ones, 6 light plain ones).
So, if you want a St. Patrick's Day wreath on your door, but you don't have a whole lot of time to invest in it (or maybe you're not quite as crafty as the people that have made the complicated wreaths), this simple wreath may be the way to go!
Happy Crafting! -Kristen
Wednesday, February 20, 2013
Saturday, February 9, 2013
Wearable Blanket (Sleep Sack)
E moves around a lot at night. He doesn't stay under a blanket long, even when it is tucked under the sides of the bed. There is also the fear of him pulling a blanket over his head in his sleep. And without a blanket, he gets cold at night, especially his little hands and feet. So I set out to solve this problem. I decided I wanted to make him a sleep sack of sorts, but I knew it needed sleeves long enough to cover his hands. I'd never made any sort of garment before and I was terrified of sewing in a zipper, but I knew I had to just go for it!
I bought a fleece blanket from a thrift store and washed it. It cost me less than $3! I also bought a zipper (I think it was 22 inches) and used thread I already had. That's all I needed to make the wearable blanket.
I started by making a pattern using a pair of E's pajamas for the outline. I used postal paper, but I wouldn't advise it, because it rolls up terribly on the ends. But it is what I had on hand. Yes, that is my coffee holding the paper down.
Once I had my outline, I pinned it to the blanket and cut it out. That piece was the back of the wearable blanket.
Sorry those pictures were sideways.
Then, to have a seam allowance for the zipper, I cut the pattern in half, pinned it down with room between the two pieces (about two inches) and cut out both pieces. These two pieces form the front of the blanket.
Also notice that I cut the collar area down for this, as you will want the collar to be lower in the front.
I then sewed the zipper up both sides and across the bottom.
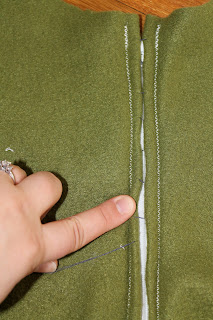
This is what the front looks like with the zipper sewn. You can see the zipper through the part where I hand sewed the pieces together.
Then I used my seam ripper to get rid of the hand sewn part and then my zipper was there, lined up between the two front pieces of fabric! Pretty hassle-free!
I accidentally made the sleeves too short, so I had to add on an extra "cuff" of sorts to make them long enough. I just cut the pieces to size and sewed them to the other arm pieces.
I then rolled the edges of all the sleeve pieces and the collar on both sides and hemmed them down. That was probably the worst part for me. It could have looked way better!
Then I laid the pieces out, "right sides" together and sewed around the blanket, avoiding the collar and wrist holes, obviously.
And then I flipped it right side out and the wearable blanket was done!
The collar was a little looser than I wanted it and the sleeves were a little tighter than I had hoped. But overall, for my first time making a garment and sewing a zipper, I think it turned out pretty well. And it keeps E warm at night, which was the goal!
So, is there anyone in your life who can't quite use a blanket yet, but still needs to be warm and snuggly at night? Make them a wearable blanket/sleep sack! -Kristen
I bought a fleece blanket from a thrift store and washed it. It cost me less than $3! I also bought a zipper (I think it was 22 inches) and used thread I already had. That's all I needed to make the wearable blanket.
I started by making a pattern using a pair of E's pajamas for the outline. I used postal paper, but I wouldn't advise it, because it rolls up terribly on the ends. But it is what I had on hand. Yes, that is my coffee holding the paper down.
Once I had my outline, I pinned it to the blanket and cut it out. That piece was the back of the wearable blanket.
Sorry those pictures were sideways.
Then, to have a seam allowance for the zipper, I cut the pattern in half, pinned it down with room between the two pieces (about two inches) and cut out both pieces. These two pieces form the front of the blanket.
Also notice that I cut the collar area down for this, as you will want the collar to be lower in the front.
Installing the zipper was the next step. I was not looking forward to this, but it ended up not being as bad as I thought! So if you're nervous, just give this a try!
I laid the two front pieces front sides together and loosely hand sewed them together down the side where I wanted the zipper (what would be the middle). I sewed it about an inch in, which is the seam allowance for the zipper.
I opened out the two pieces of fabric, front side down. I folded back (and iron if needed) the zipper seam allowance. Then I placed the zipper over the middle of the blanket, being sure to line it up in the space between the two pieces. I then pinned the zipper down.
I also sewed up the rest of the front of the blanket, because the zipper wasn't long enough to go all the way down.
I then sewed the zipper up both sides and across the bottom.
This is what the front looks like with the zipper sewn. You can see the zipper through the part where I hand sewed the pieces together.
Then I used my seam ripper to get rid of the hand sewn part and then my zipper was there, lined up between the two front pieces of fabric! Pretty hassle-free!
I accidentally made the sleeves too short, so I had to add on an extra "cuff" of sorts to make them long enough. I just cut the pieces to size and sewed them to the other arm pieces.
I then rolled the edges of all the sleeve pieces and the collar on both sides and hemmed them down. That was probably the worst part for me. It could have looked way better!
Then I laid the pieces out, "right sides" together and sewed around the blanket, avoiding the collar and wrist holes, obviously.
And then I flipped it right side out and the wearable blanket was done!
The collar was a little looser than I wanted it and the sleeves were a little tighter than I had hoped. But overall, for my first time making a garment and sewing a zipper, I think it turned out pretty well. And it keeps E warm at night, which was the goal!
So, is there anyone in your life who can't quite use a blanket yet, but still needs to be warm and snuggly at night? Make them a wearable blanket/sleep sack! -Kristen
Subscribe to:
Posts (Atom)