A post to my family and friends:
Have you ever had a goal you knew you wanted to reach, but you were afraid to step out and go for it? For a while now I've know that I want to go into photography as a career. I want to use my camera to capture moments and memories for other people. I love taking photos of Elijah. I love to look back at those pictures and remember those moments that passed so quickly and I want to provide that for others. I've been honing my skills, learning my camera up and down, practicing all the time. I know that I want to start my own business and share my skills. So what's stopping me?
Well, first there are the "ifs," such as - I'd start my own business IF I had more money (to buy more equipment, props, etc). I'd start building my portfolio IF I had more time.
Then you have the "ands." AND I'll need more experience before anyone will actually want to use me to capture their most precious moments. AND who is going to want to let me practice on them?
And don't forget the "buts." BUT what if it turns out I'm not that great? BUT what if I do a photo shoot and the people don't like the pictures? BUT how am I supposed to start my photography business when I'm already so busy? BUT what if I fail?
That's the biggest thing of all. What if I fail? What if I'm not good enough? What if I can't make enough money to actually do this as my career? There are a thousand things I could worry about. A million things that can hold me back. I'm sure you've been there at least once in your life.
But I know that if I want to make this happen, I can't sit around wishing and dreaming about it. I need to GO FOR IT. I'm afraid. No, I'm terrified. Of failure. Of rejection. Of wanting all of this and not knowing if it is going to work out. But I know that I have family and friends that support me, a husband who's got my back, and a God who knows what His plans for me are. And if I do fail, at least I can say that I tried. At least I won't look back and think "Why didn't I ever go for it? Why didn't I pursue my dream job?"And I'd rather give it a good run and do my best than have the regret of never taking that first step.
But I can't do it alone. I need support. I need encouragement. And most importantly - I need clients. I need beautiful faces to take pictures of. I need memories to capture. And you can help me. I need to build my portfolio so that I have photos to show to potential clients. Will you help me by letting me do a portfolio shoot of you/your family?
I'd love to ultimately specialize in newborn and birth photography. So any shoots like that would be absolutely wonderful. But I want to have a portfolio that shows a wide array of subjects - maternity, graduating seniors, kids, families, engagements (and other couples), etc. I can even do candid photography of a party or other event.
I want to make this happen. I want to reach my goal of having my own photography business so that I can help provide for my family by doing something that I absolutely love. I know I have a long way to go. A lot of learning to do. But I don't want to let my fear stand in the way of my dream.
Please let me know if you are interested in having a photo shoot done. You can contact me by personal message on my Facebook page. Or by e-mail at kadkins12@my.stlcc.edu .
Thank you so much for reading and for your love and support. -Kristen
Monday, May 20, 2013
Monday, April 8, 2013
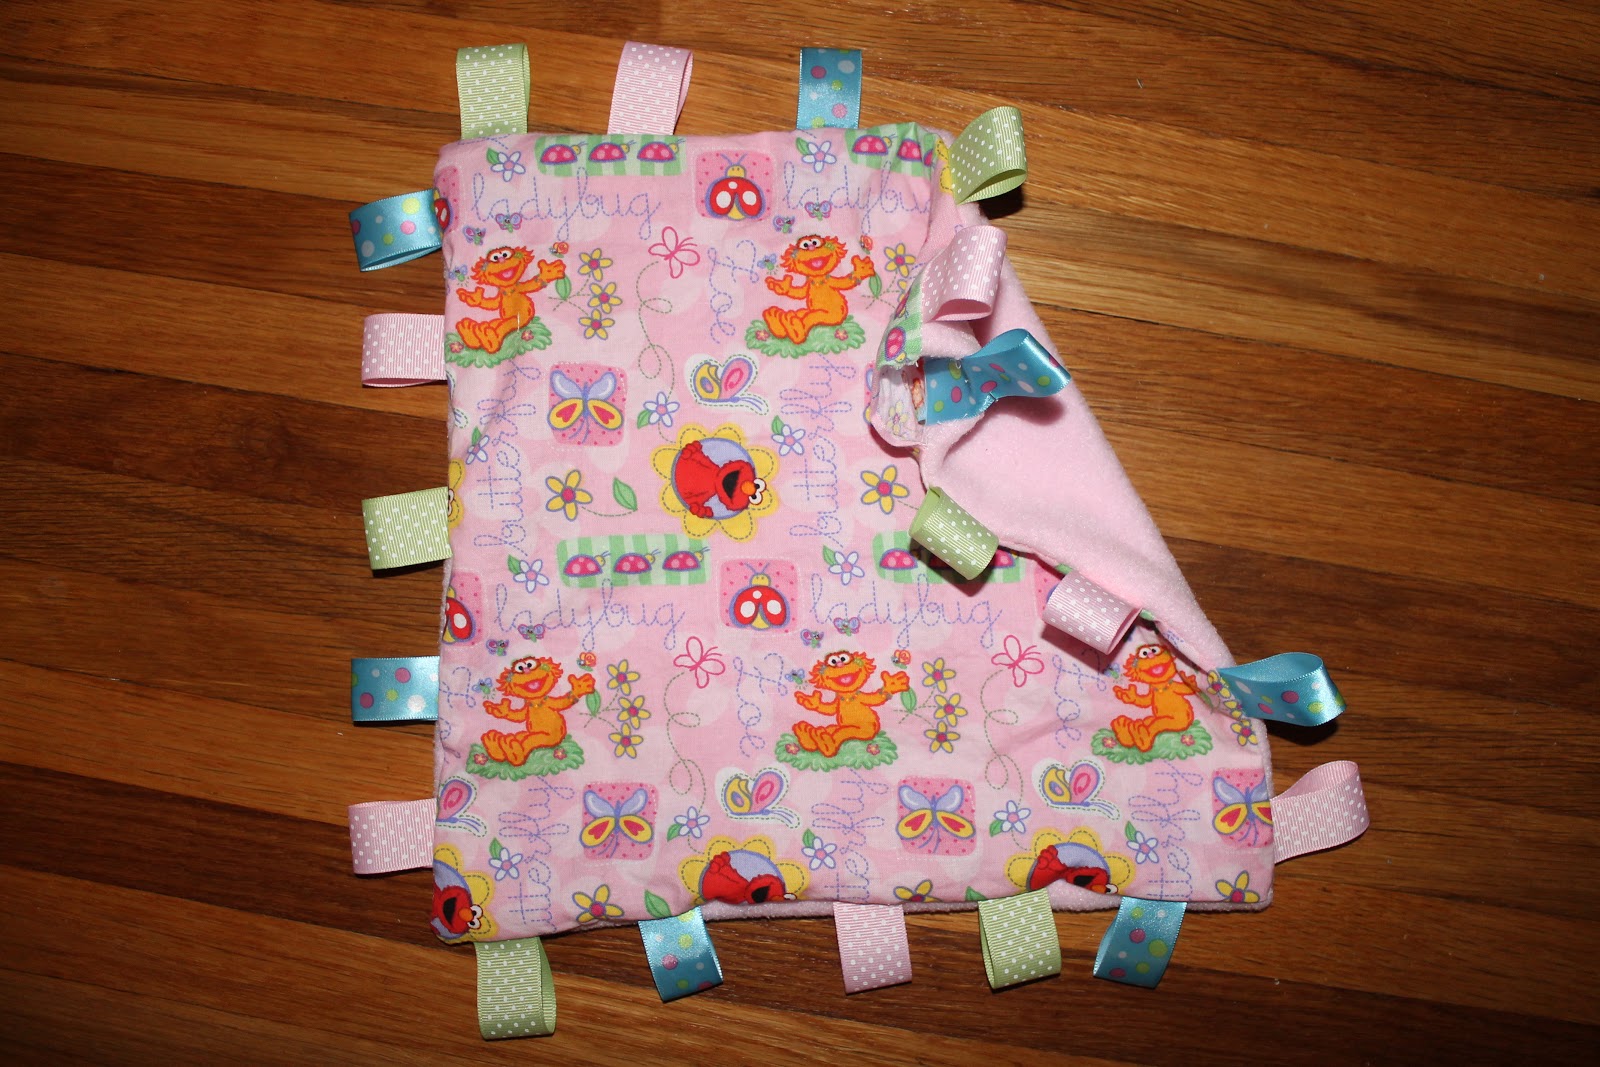
Taggie Blanket for Baby - Tag Lovey
Want to make a taggie blanket for a baby in your life? They make great baby shower gifts!


Start by cutting two coordinating fabric pieces (I suggest at least one piece be something very soft- I used fleece) into 13x13 squares. The blanket will end up being 12x12 after you sew it.
This picture only shows one of my pieces, but you get the idea.

Then cut 25 strips of coordinating ribbon. The length is up to you, but you will want them to be long enough to stick out decently far from the blanket, as well as having at least an inch inside the blanket.

Lay your back fabric right side up and fold and pin down your ribbons. The loop of the ribbon should be facing INWARD so that when you turn the blanket inside out, the ribbons hang out.

Pin your front fabric right sides together with the back fabric (the ribbons should be between the two pieces of fabric).

Sew around the blanket, leaving a hole and then turn the blanket inside out. Take out all of the pins (you wouldn't want a baby finding on later)!
Sew the hole shut with a ladder stitch.

Then sew around the inside edge of the of the blanket. Then you're finished!

Happy crafting! -Kristen


Start by cutting two coordinating fabric pieces (I suggest at least one piece be something very soft- I used fleece) into 13x13 squares. The blanket will end up being 12x12 after you sew it.
This picture only shows one of my pieces, but you get the idea.

Then cut 25 strips of coordinating ribbon. The length is up to you, but you will want them to be long enough to stick out decently far from the blanket, as well as having at least an inch inside the blanket.

Lay your back fabric right side up and fold and pin down your ribbons. The loop of the ribbon should be facing INWARD so that when you turn the blanket inside out, the ribbons hang out.

Pin your front fabric right sides together with the back fabric (the ribbons should be between the two pieces of fabric).
Sew around the blanket, leaving a hole and then turn the blanket inside out. Take out all of the pins (you wouldn't want a baby finding on later)!
Sew the hole shut with a ladder stitch.

Then sew around the inside edge of the of the blanket. Then you're finished!

Happy crafting! -Kristen
Sunday, April 7, 2013
Hanging Crib Toy Bag
Our 15 month old son wakes up before us in the morning. We get a little more sleep if he plays for a while. He does better if he has toys, but I don't just want toys lying all over his crib while he sleeps just so he can have them in the morning. So I decided to make a bag to hang in his crib that will hold his toys so he can play with them when he wakes up, but they are not in his way during sleep.

 My husband is a chef and recently retired a pair of his work pants. I decided to use part of the fabric to make this bag. I simply cut off a piece the size I wanted with an extra 2 inches for seam allowance. I cut it in way that left the two leg seams in tact. You can create the same effect by sewing two pieces of cloth together two opposite sides (do this with the right sides facing each other).

I also hemmed the top edges of my bag.


 My husband is a chef and recently retired a pair of his work pants. I decided to use part of the fabric to make this bag. I simply cut off a piece the size I wanted with an extra 2 inches for seam allowance. I cut it in way that left the two leg seams in tact. You can create the same effect by sewing two pieces of cloth together two opposite sides (do this with the right sides facing each other).
Then, with the right sides facing each other, sew across the bottom of your bag.


Then I turned the bag right side out and sewed two ribbons onto the back.

You can see I sewed them in two places for extra holding strength.

I then tied the bag onto my son's crib.

I wrapped the ribbons around two bars and then tied the two ribbons together in the middle so that the bag was on a little tighter.

I put E in his crib and he went straight for the bag. Of course, he took the toys out and directly threw them on the floor. But I'm hoping when he actually wakes up tomorrow morning, he will play with the toys instead of flying them out of his crib!


NOTE: Make sure that the bag is not low enough down that it could cover your child's face during sleep and also be sure to tie the bag on very tight, so it cannot be pulled off and pulled over your child's face. Any cloth in a crib can be a suffocation hazard, so always use caution!
Hopefully this will help me enjoy a few extra minutes of sleep in the morning since E will have toys to play with in his crib! Happy Sunday! -Kristen
Friday, March 29, 2013
Easter Egg Door Hanger Decoration
Easter is almost here (it came quickly this year)! Do you need something quick to decorate your door? This project took me less than 20 minutes (and that includes gathering and putting away my supplies)!

First cut some yarn (enough pieces for each egg you want to use) to a length a few inches LONGER than you want your eggs to hang from your wreath hanger. Tie a knot on one end of each string. I double knotted mine just to be safe.

Then insert the yarn into the hole in the Easter egg and pull it through until it stops at the knot.


Gather the plastic eggs you want to use. The amount and color are totally up to you! You will also need yarn (I used white) and some pretty Easter colored ribbon.
There are holes in the top of most plastic eggs. If your eggs do not have holes, you will need to put holes in them to do this project.


Once you close your eggs, the string will hang out of the egg, and should not come out when you hold it only by the string. If it comes out, you will need to tie a bigger knot.

Gather all of your eggs together how you want them to hang (you will want to hold them by your door to make sure the length it right for how you want them to hang) and then tie all the strands of yarn into a knot.

Then tie another knot (I did mine with a small loop so it can easily be removed and put back up next year) around your wreath hanger. Then trim the yarn close to the knot.

Add your Easter colored ribbon and you're done!
I hope everyone has a very happy Easter! He is Risen!!! -Kristen
Monday, March 11, 2013
Sensational Scrap Sandals!
Spring is coming! Are your feet ready for some flip flop action?!? I know mine are! I decorated some kids flip flops with fabric scraps. This could easily be done with adult sandals, but of course your would need more scraps.

Cut a BUNCH of strips to about 6x3 inch strips. They don't have to be exact, as the final product should be a bit frazzled-looking anyway. After you cut a bunch of strips, start tying them on your sandals. I double knotted mine. I ended up tying about 32 strips on each sandal, so about 64 per pair (it is a lot of work and you may get finger cramps - just fair warning). I positioned the strips so they weren't all facing the same exact direction, but so that they were all facing out from the foot.

I used lovely spring colors and butterflies, but you could do these in any color or pattern. You could do all one type of fabric or use several different ones like I did. Use your imagination and see what you can come up with. Have a favorite sports team or need a pair to wear to school events? Use those colors! Have a favorite holiday? Make some to wear for that!

Go flip flop crazy! -Kristen


Wednesday, February 20, 2013
Simple St. Patrick's Wreath
I have become obsessed with the idea of having a wreath on my door for everything. So, I knew I needed to make a wreath for St. Patrick's Day. It isn't anything fancy, but I think people can tell what holiday it is for (and that's the point, right?), and it was very easy to make.


I started by carving a wreath-shape out of cardboard, like in this post. I just made a simple circle wreath. I then covered the wreath in cloth strips. I cut them about an inch and a half wide and wrapped them around the cardboard, overlapping as I went. (Note: They were different lengths because of some projects I had done with the fabric before.) I attached the fabric with hot glue as I went around the wreath.

I then used hot glue to glue on the three shamrocks at the bottom of the wreath. Then I wanted one to be hanging. I wrote "LUCK" on the hanging shamrock with glue and covered it with glitter. I hot glued ribbon to the back of it (long piece folded in half, the loose ends hanging off, not connected to the shamrock), then part of the way up the ribbon, I glued the ribbon to the wreath, leaving the excess hanging off at the top. I tied a bow at the very end of the ribbon and hung it from my wreath hanger.
I bought the shamrocks at Dollar Tree. The package came with 12 shamrocks (6 dark glittery ones, 6 light plain ones).
So, if you want a St. Patrick's Day wreath on your door, but you don't have a whole lot of time to invest in it (or maybe you're not quite as crafty as the people that have made the complicated wreaths), this simple wreath may be the way to go!
Happy Crafting! -Kristen
Saturday, February 9, 2013
Wearable Blanket (Sleep Sack)
E moves around a lot at night. He doesn't stay under a blanket long, even when it is tucked under the sides of the bed. There is also the fear of him pulling a blanket over his head in his sleep. And without a blanket, he gets cold at night, especially his little hands and feet. So I set out to solve this problem. I decided I wanted to make him a sleep sack of sorts, but I knew it needed sleeves long enough to cover his hands. I'd never made any sort of garment before and I was terrified of sewing in a zipper, but I knew I had to just go for it!
I bought a fleece blanket from a thrift store and washed it. It cost me less than $3! I also bought a zipper (I think it was 22 inches) and used thread I already had. That's all I needed to make the wearable blanket.

I started by making a pattern using a pair of E's pajamas for the outline. I used postal paper, but I wouldn't advise it, because it rolls up terribly on the ends. But it is what I had on hand. Yes, that is my coffee holding the paper down.

Once I had my outline, I pinned it to the blanket and cut it out. That piece was the back of the wearable blanket.
Sorry those pictures were sideways.

Then, to have a seam allowance for the zipper, I cut the pattern in half, pinned it down with room between the two pieces (about two inches) and cut out both pieces. These two pieces form the front of the blanket.

Also notice that I cut the collar area down for this, as you will want the collar to be lower in the front.


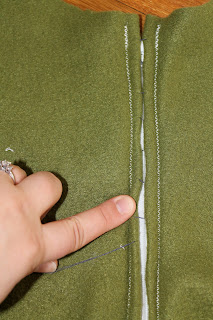
I then sewed the zipper up both sides and across the bottom.
This is what the front looks like with the zipper sewn. You can see the zipper through the part where I hand sewed the pieces together.

Then I used my seam ripper to get rid of the hand sewn part and then my zipper was there, lined up between the two front pieces of fabric! Pretty hassle-free!

I accidentally made the sleeves too short, so I had to add on an extra "cuff" of sorts to make them long enough. I just cut the pieces to size and sewed them to the other arm pieces.
I then rolled the edges of all the sleeve pieces and the collar on both sides and hemmed them down. That was probably the worst part for me. It could have looked way better!

 Then I laid the pieces out, "right sides" together and sewed around the blanket, avoiding the collar and wrist holes, obviously.
And then I flipped it right side out and the wearable blanket was done!


The collar was a little looser than I wanted it and the sleeves were a little tighter than I had hoped. But overall, for my first time making a garment and sewing a zipper, I think it turned out pretty well. And it keeps E warm at night, which was the goal!
So, is there anyone in your life who can't quite use a blanket yet, but still needs to be warm and snuggly at night? Make them a wearable blanket/sleep sack! -Kristen
I bought a fleece blanket from a thrift store and washed it. It cost me less than $3! I also bought a zipper (I think it was 22 inches) and used thread I already had. That's all I needed to make the wearable blanket.

I started by making a pattern using a pair of E's pajamas for the outline. I used postal paper, but I wouldn't advise it, because it rolls up terribly on the ends. But it is what I had on hand. Yes, that is my coffee holding the paper down.

Once I had my outline, I pinned it to the blanket and cut it out. That piece was the back of the wearable blanket.
Sorry those pictures were sideways.

Then, to have a seam allowance for the zipper, I cut the pattern in half, pinned it down with room between the two pieces (about two inches) and cut out both pieces. These two pieces form the front of the blanket.

Also notice that I cut the collar area down for this, as you will want the collar to be lower in the front.

Installing the zipper was the next step. I was not looking forward to this, but it ended up not being as bad as I thought! So if you're nervous, just give this a try!
I laid the two front pieces front sides together and loosely hand sewed them together down the side where I wanted the zipper (what would be the middle). I sewed it about an inch in, which is the seam allowance for the zipper.


I opened out the two pieces of fabric, front side down. I folded back (and iron if needed) the zipper seam allowance. Then I placed the zipper over the middle of the blanket, being sure to line it up in the space between the two pieces. I then pinned the zipper down.
I also sewed up the rest of the front of the blanket, because the zipper wasn't long enough to go all the way down.
I then sewed the zipper up both sides and across the bottom.
This is what the front looks like with the zipper sewn. You can see the zipper through the part where I hand sewed the pieces together.

Then I used my seam ripper to get rid of the hand sewn part and then my zipper was there, lined up between the two front pieces of fabric! Pretty hassle-free!

I accidentally made the sleeves too short, so I had to add on an extra "cuff" of sorts to make them long enough. I just cut the pieces to size and sewed them to the other arm pieces.
I then rolled the edges of all the sleeve pieces and the collar on both sides and hemmed them down. That was probably the worst part for me. It could have looked way better!


And then I flipped it right side out and the wearable blanket was done!


The collar was a little looser than I wanted it and the sleeves were a little tighter than I had hoped. But overall, for my first time making a garment and sewing a zipper, I think it turned out pretty well. And it keeps E warm at night, which was the goal!
So, is there anyone in your life who can't quite use a blanket yet, but still needs to be warm and snuggly at night? Make them a wearable blanket/sleep sack! -Kristen
Subscribe to:
Posts (Atom)